Reset Settings - PIXMA TR4720
Reset Settings - PIXMA TR4720

Description
Learn how to reset various settings on the PIXMA TR4720.
Solution
To reset various settings in the PIXMA TR4720, follow these steps.
-
Press the Setup
 button on the operation panel to access the Setup menu.
 -
Press the
 button until Device settings appears.
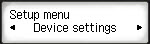
Press the OK button.
-
Press the
button until Reset setting appears.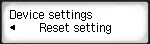
Press the OK button.
You can return all settings you made to the printer back to the default. However, some data may not be changed, depending on the current usage state of your printer.
Press the  or buttons to select the setting you want to reset, then press the OK button. When Reset? appears, press the or buttons to select Yes, then press the OK button.
 Depending on the setting item, it is necessary to perform connection or setup again after you have returned the setting back to the default.
-
Web service setup

Returns the Web service settings back to the default.
-
LAN settings

Returns the LAN (Local Area Network) settings back to the default.
You will need to reconnect the printer to a wireless router if you wish to use on a network again. -
Telephone no. data

Returns the telephone/fax number settings to default.
-
Setting data
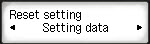
Returns the settings such as the paper size, media type, or other setting items other than the LAN settings or the fax settings back to the default.
-
FAX settings
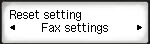
Returns the fax settings back to the default. Disconnect the telephone line from the printer before you return this setting item back to the default.
After resetting, perform setup again as necessary.
-
All data

Sets all settings you made to the printer back to the default. The administrator password specified by Remote UI reverts to the default setting.
After resetting, perform setup again as necessary.
 You cannot set the following setting items back to the default:
-
The language displayed on the LCD
-
The current position of the print head
-
CSR (Certificate Signing Request) for encryption method (SSL/TLS) setting
-
The country or region selected for Country or region
You can delete the registered user's name or telephone number following the procedure below.
-
Display Unit TEL no. registr. or Display Unit name registr..
-
Setting Sender Information
-
-
Delete all the numbers and the letters by pressing the Back
 button.
 -
Press the OK button after deleting all the numbers and the letters.
-
After resetting any of the settings on the printer, press the Copy  , Fax
, Fax  , or Scan
  buttons to return to its respective mode on the printer. You can also press the Setup button to return to the top of the Setup menu.
https://support.usa.canon.com/kb/index?page=content&id=ART180489
Comments
Post a Comment